
 It’s about time I add another post about my actual teaching practice and how my kids use iPads. One set of iPad skills that interests all the kids and gives them something fun to do is professional film making tricks. This would work well with students from the age of 10 to 16.
The lesson is divided in 2 :
- Sound (Sound effects / Dubbing / voiceovers)
- Camera work (Steady-cam / multi views per moment)
The requirements in general are that at least one student in 4 has the iMovie app or equivalent (There are free movie editing apps but they sometimes limit to 30 seconds export – check the App store).
I then take them through some remarkable facts in film making that they might never have considered. This gives them a new understanding about exactly what they see and hear on the screen.
STEP 1: SOUND
Foley – Dubbing – Voiceover
One of the difficulties when filming with iPads is that the microphone is too small and too far from the actor or subject to record it properly. First I show this Youtube clip that amazes the kids by explaining that no sound they’ve ever heard on TV or film is made by the things you are looking at. Every footstep, every bang, every animal noise is made after the filming has taken place. The extreme moment is the leather clothing noise as Russell Crow turns around – all added afterwards! I also explain that most voice is also added afterwards and dubbed over by the same actors.
The Art of noise making is called Foley, which you will see in the credits of every film. The Dubbing of their own voice challenges the students to be precise and, as I’ve found, take the process seriously to get the timing right (it’s done well by about half the students).Dubbing and voice overs using iMovie also solves the practical problems of both outside noise and also background classroom noise when filming inside. The students film themselves saying the lines in the appropriate location and then find a quiet area elsewhere to record the lines more clearly. Having clear dialogue makes kids films much more watchable.
STEP 2: CONTINUITY & MULTI CAMERA
The idea that 60 seconds of hollywood film can take more than a week of production and then more time in post production also amazes kids. I have a Keynote slide where a counter on the slide counts the camera angle changes in 25 seconds and ends at 12! My students have learnt to really tell the story of any 10 seconds. Even with one iPad between 4, the students have learnt to rerecord every moment from the required angel to tell the story visually. Example: “A student walks towards a door and opens it.” This took 4 recordings from 4 angles and included a close-up of the hand gripping the handle! Close-ups are important to emphasise. The total filming time took 4 minutes and editing took 5 minutes, the finished shot takes 5 seconds! … But the kids love it and are proud of the professional look to the film. The video below is a good video on continuity errors in Star Wars. The length of time it takes to make the shortest of moments means that objects in the shot often get accidentally moved or forgotten in some of the various camera takes. Unfortunately I have to skip over the video’s first example as it’s not actually a continuity error but just bad acting!
STEP 3: ALLOWING FOR TIME AND APPS
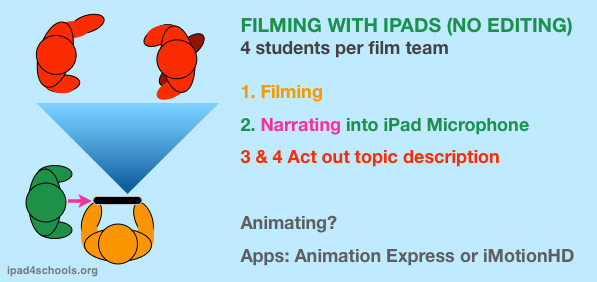
Sometimes a group might not have an editing app or you might not have the time for editing, so I also give a lesson in allowing for the limitations of filming with just a mobile device like an iPad, particularly when filming outside or in a classroom with noise. Using the diagram below, I explain that relying on the dialogue of the actors/presenters being picked up by the iPad’s microphone is not realistic and it’s best to narrate the events that are filmed. To allow for time, this narration can be done live during the performance, directly into the iPad’s microphone by another student works well in covering your topic.
SUMMARY: THEY HAVE FUN, LEARN & EDUCATE THEIR PEERS!
I was genuinely surprised by how much the kids took these techniques seriously and enjoyed the process. The students that started to add every noise imaginable and / or rerecorded until their dubbing was perfect made their videos clearer and more educational to other students I was showing them to. The topic they are filming about is the real educational target and having good sound and good visual story yelling is crucial to the learning.
