
 Apple TV (US$99) is a box you attach to the projector / TV that picks up the screen of any iPad and displays it without the need for wires! The teacher can walk around their room and display anything that’s on their iPad screen on the Projector/TV. This means the teacher can display from anywhere and even use the iPads camera to show student work ‘live’ without gathering students around one point in the room
I have recently been setting up Apple TV in my classroom and know that many teachers will be having the problems with Apple TVs on networks that are setup with the type of security and extra stuff that one gets on a corporate style network.
Particularly in secondary schools, your ‘techies’ will be using all these silly techie acronyms like “VLANS” and “IP-ROUTING” and “APs”, so ignore them and read this, which I hope to be more ‘teacher-friendly’ (something many techies aren’t!)
.

STEP 1: Connecting the Apple TV box to your projector / TV.
 Being all ‘up-to-date’, Apple has only added an HDMI port to the box. That’s fine if you have a modern flat-screen TV as it will probably have an HDMI port on the back. Most school projectors however, only have the older VGA port, like the ones we’ve always had on our Windows laptops (sometimes blue in colour). Apple’s store provides a converter HERE.
For future decision making, I would recommend only purchasing 50″ plasma TVs and not projectors as they work without darkening the room, they last longer without replacing bulbs plus require less cabling setup. This lowers future costs and makes the Apple TV setup cheaper than the alternatives.
STEP 2: Putting the Apple TV onto the same network your iPads use.
 If you have a simple open network that any device can join with a password then you can follow the instructions the Apple TV gives you on the TV screen. But most schools use corporate secure networks with proxy servers for internet. This means that the school network info needs to be loaded onto the Apple TV (a little trickier). On a Mac (either the schools or a borrowed one) you can get an App from the MAc app store called “Apple Configurator”. It’s used for setting up both Apple TVs and iPads in bulk.
The idea is that you setup a ‘profile’ for the Apple TV to store your network’s settings. When using configurator to design you profile the main 2 screens to worry about are 1. WIFI & 2. Certificate (See below). Here’s Apple’s Configurator’s help page
The WIFI page of a profile holds the basic name of the network and any login info the Apple TV box will need to join the network. You might need to get some info from a techie (smile and ask nicely!)

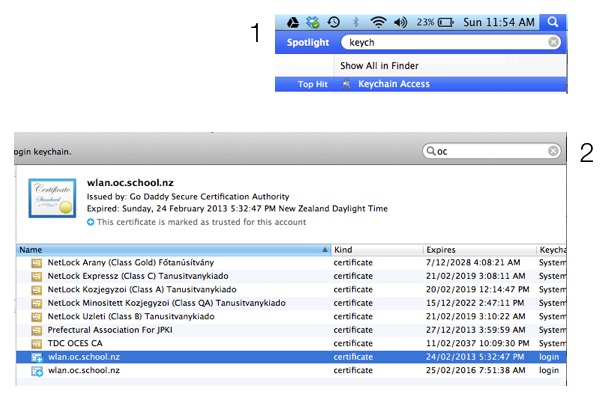
The ‘certificate’ page is where you need to give a file to the Apple TV box to say the network and Apple TV are following the same ‘rules’ when talking. This part is the trickiest. On the mac, join the wireless network and you will get the Certificate file. To find the file you can use the Mac’s Keychain Access (1 use Spotlight to find that!) and search for the wireless name (2). See pic below.
Once you have added the network info and the certificate to the Apple TV profile, you need to ‘Prepare’ the Apple TV with this profile. To do this you use the USB cable port that’s on the back of the Apple TV. It uses the same cable as many cameras use. Once the profile is on the Apple TV and it’s restarted it should join the Network.
Apple Tvs are best on a network cable
Apple TVs work best if the Apple TV box is not actually using the Wireless but is on the network using the network Cable (ethernet). As long as the techie allocates the port in the wall to the same network as the wireless then you half the pressure on the wireless in the room but the iPads can still see the Apple TV box. The ethernet cables are that Yellow/Red/Blue cable the computers sometimes use for network.
3. Sending your iPad’s screen to the Apple TV

1. Make sure you can see the Apple TVs ‘Home screen’ on the TV or Projector first. (See pic)
.
.
.
.
.
.
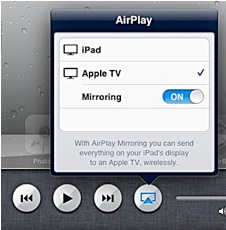
2. As long as the wireless is strong enough, a Double tap of the iPad’s Home button will bring up the Apps across the bottom (Where you might normally class apps or switch between them). A swipe to the left will send you to the Volume / Brightness settings and also the AIRPLAY options (If the Apple TV is on the network – see pic).
3. You need to switch “Mirroring” on and the iPad’s screen should appear on the TV / Projector.
4. With a really good wireless, even a movie’s sound playing on the iPad will play through the TV as if you had a DVD playing!
SUMMARY
I can’t guarantee that following this info will mean you don’t have other problems with setting up Apple TV on a corporate style network but it might help, so here’s that Apple’s Configurator’s help page again! I’ve had issues myself, particularly with the network being shared by so many devices and setting it up so the Apple TV is not fighting too many other students for access to the Wireless box (Access point). This might take a little classroom management and getting kids to turn wireless off on the iPads for a minute or 2. All I can say is Good luck and let me know if you are successful / or if I have approached it wrong and you have an easier way!
